
Hi Everyone..
I love my brick home but its the normal reddish with blue sorta brick and while thats great for outdoors, it wasnt suiting me in the family room.. You see one of the walls used to be an exterior wall and it was the reddish brick, like this..

 My family room is painted relaxed khaki, with soft white trim and soft white below the chair rail. This red brick just wasnt working for me...
this photo shows me doing the faux treatment on it..

This isnt the easiest room to photograph..
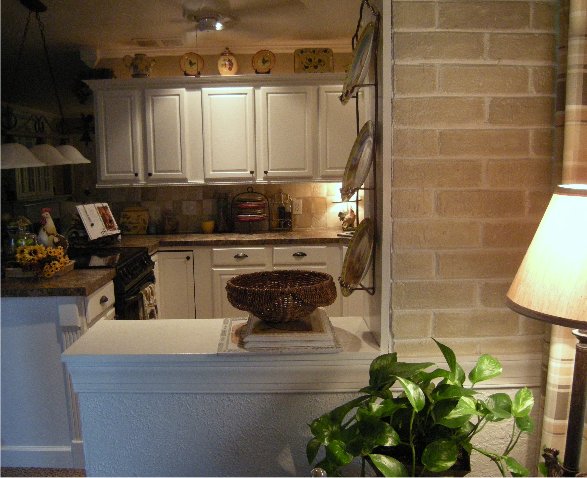
 On the side of the room, you can see into the kitchen , the paint colors are the same and now the brick mimics the backsplash..

The tutorial below takes you step by step so if you'd like to you can also change your brick:)
if you have any questions, email me and I'll try to help you...
Thanks so much for visiting me and peeking at my brick transformation...
Sonny
*********************************
TUTORIAL
step 1
I painted my entire wall my trim color- which was soft white/satin finish by SW.. the WHOLE wall brick and grout.. this requires a deep nap roller cover and keep a brush handy to push the paint into any of the stubborn crevices of the brick.. I did 2 coats waiting 3 hours in between for dry time..
you all know what plain white brick looks like so, no need for me to show you that...
allow 12 full hours for drying time because in some of those brick crevices it can stay wet a lot long than the surface paint indicates...
step 2...
you need a pack of stencil brushes from large to small.. I got mine at walmart for 5.99
3 plastic sour cream containers~~they have great snap lids you'll be closing them and resting, believe me and you dont want your mixed paint to dry out ..
My wall color is relaxed khaki by sw...
in container no. 1 the straight paint goes in about 1/2 full is enough-- it goes along way..
using country brown craft paint , I tinted the next container of relaxed khaki with 1/3 of the craft paint to darken it..
container 3 is relaxed khaki and 2 oz. of water. stir well..
step 3...
cover the floor
using your smallest tip stencil brush in about a 5x5 space and randomly "squiggle" some of container number 2::the tinted darker color:: onto the brick in places-- NOT all over.
~!!!! the stencil TIP is all that will have paint on it-- do NOT dip the brush into the paint.. Just the tip gets color..
continue in 5x5ft. spaces until that step is completed..
PS: this is gonna look scary cause when you step back it'll look like worms on your fresh white wall-- but your fine thats how its supposed to look.
step 4...
now using container 3 ::: the watered down wall color using the medium size stencil brush in your pack-- start again with the 5x5 space you started with in step 1.. several hours should have passed between steps so its dry... dip the tips of your brush and tamp it on the brick ONLY ,, if this runs it will get on your beautiful new grout.. keep some q tips handy just in case to get that off- but seriously-- try not to let it drip..
continue working those 5 by 5 ft. spaces as in step one.
heres a pic of that process ...I wait to do the bottom till I can scoot across the floor cause once I get down there I'm not getting up till I'm done lol
step 5...
now container 3 has the straight paint color in it and what you want to do is dip only the tips of your brush and pounce all over the brick-randomly- dont redip. No worry//when it dries it wont look like dots lol. this really will help each brick be a bit different, just as they are in nature..
total supplies even with NONE on hand would only be about 50.00 -thats paint//brushes and plastic drop cloth. Sometimes there are sales on regular white paint- doesnt have to be any fancy brand. Once its on brick it isnt coming off
Time.. just taking a ballpark guess I'd say 7 full hours... that doesnt include drying time in between the initial coat of paint..
a fireplace would take maybe 2 1/2 hours.
I love my brick home but its the normal reddish with blue sorta brick and while thats great for outdoors, it wasnt suiting me in the family room.. You see one of the walls used to be an exterior wall and it was the reddish brick, like this..


this photo shows me doing the faux treatment on it..

This isnt the easiest room to photograph..

The tutorial below takes you step by step so if you'd like to you can also change your brick:)
if you have any questions, email me and I'll try to help you...
Thanks so much for visiting me and peeking at my brick transformation...
Sonny
*********************************
TUTORIAL
step 1
I painted my entire wall my trim color- which was soft white/satin finish by SW.. the WHOLE wall brick and grout.. this requires a deep nap roller cover and keep a brush handy to push the paint into any of the stubborn crevices of the brick.. I did 2 coats waiting 3 hours in between for dry time..
you all know what plain white brick looks like so, no need for me to show you that...
allow 12 full hours for drying time because in some of those brick crevices it can stay wet a lot long than the surface paint indicates...
step 2...
you need a pack of stencil brushes from large to small.. I got mine at walmart for 5.99
3 plastic sour cream containers~~they have great snap lids
My wall color is relaxed khaki by sw...
in container no. 1 the straight paint goes in about 1/2 full is enough-- it goes along way..
using country brown craft paint , I tinted the next container of relaxed khaki with 1/3 of the craft paint to darken it..
container 3 is relaxed khaki and 2 oz. of water. stir well..
step 3...
cover the floor
using your smallest tip stencil brush in about a 5x5 space and randomly "squiggle" some of container number 2::the tinted darker color:: onto the brick in places-- NOT all over.
~!!!! the stencil TIP is all that will have paint on it-- do NOT dip the brush into the paint.. Just the tip gets color..
continue in 5x5ft. spaces until that step is completed..
PS: this is gonna look scary cause when you step back it'll look like worms on your fresh white wall-- but your fine
step 4...
now using container 3 ::: the watered down wall color using the medium size stencil brush in your pack-- start again with the 5x5 space you started with in step 1.. several hours should have passed between steps so its dry... dip the tips of your brush and tamp it on the brick ONLY ,, if this runs it will get on your beautiful new grout.. keep some q tips handy just in case to get that off- but seriously-- try not to let it drip..
continue working those 5 by 5 ft. spaces as in step one.
heres a pic of that process ...I wait to do the bottom till I can scoot across the floor cause once I get down there I'm not getting up till I'm done lol
step 5...
now container 3 has the straight paint color in it and what you want to do is dip only the tips of your brush and pounce all over the brick-randomly- dont redip. No worry//when it dries it wont look like dots lol. this really will help each brick be a bit different, just as they are in nature..
total supplies even with NONE on hand would only be about 50.00 -thats paint//brushes and plastic drop cloth. Sometimes there are sales on regular white paint- doesnt have to be any fancy brand. Once its on brick it isnt coming off
Time.. just taking a ballpark guess I'd say 7 full hours... that doesnt include drying time in between the initial coat of paint..
a fireplace would take maybe 2 1/2 hours.

WOW Sonny that looks so much lighter and brighter. I would be hesitant to paint interior brick, although I have seen it before...I must say yours made a remarkable difference! Nice Job! Debbie
ReplyDeleteIt turned out really nice! It does match the tile in the kitchen:@)
ReplyDeleteSonny, I love the new look. Looks like it was a lot of work, but oh so worth it.
ReplyDeleteSonny, that "new" brick is awesome!! I love it.
ReplyDeleteIt looks so good! Way to go to be brave and make a change! :D
ReplyDeleteHi Sonny, the wall look fabulous. I am thinking of doing this to a field rock fireplace.
ReplyDeleteYou did a great job!
Barb
What a beautiful way to highlight the brick, AND make it blend.
ReplyDeleteI wish I had some brick inside to do that to!
It looks awesome with the kitchen, too!
The makeover was worth it!
Hugs and blessings to you!
~me
The new color on the brick looks great! It looks like it would be really hard to paint brick.
ReplyDeleteSuch a transformation. The red brick is definitely pretty but I am sure this brightens up the room and makes it much easier to decorate. Great tutorial. I would be flattered if you would consider linking it up at one of my first linky parties - Motivated Monday at Becolorful
ReplyDeletePam
It looks very nice, Sonny. Great job!...Christine
ReplyDeleteYou did a wonderful job, it is an amazing transformation! Nicole
ReplyDeleteIt looks FAB.U.LOUS! I love it... Don't you think it added continuity? Love the kitchen too.. Very, very pretty!
ReplyDeleteHuggies,
Spencer
Looks very nice - and peeking in there I have to say: LOVE your kitchen!
ReplyDeleteBest regards,
Gloria
It makes such a difference! Now you feel like you are inside instead of kind of outside on the porch watching television. Great work and inspired idea. Thanks for the tutorial.
ReplyDeleteHi Sonny! Oh, you did so good and your wall looks great! Thank you so much for your sweet comments and I hope you'll come to my Heart of the Home Party!!
ReplyDeleteBe a sweetie,
Shelia ;)
Amazing and such a great tutorial. Thanks for sharing it at my Motivated Monday party.
ReplyDeletePam @ Becolorful
I'm reading sporadically thru some old decorating posts and had to say this turned out wonderful.
ReplyDelete