Sunday, October 10, 2010

A Little Fall for Ya'll

  I sure have missed you folks.. We still have another load to go to goodwill.  I knew when he mentioned cleaning the storage building we were in for a HUGE mess.. It still isn't a place of beauty but I can walk in there and see what I need to grab off a shelf, which is a vast improvement I assure you..
  The painters came and removed the many layers of wallpaper and patched all the holes and spots where the sheet rock tore away.. I love seeing pretty wallpaper in others homes but I don't think I'll ever have any put up again.. Its just too hard to get rid of..
**************************
  I'm participating in Meta Monday with Susan at Betweens Naps on the Porch.
 Please take a few minutes and go see all the beautiful transformations folks have posted for your viewing enjoyment..
http://betweennapsontheporch.blogspot.com/2010/10/rats-infestation-across-blogland.html
********************
 It took them 8 days to get back to me to sand and paint and then 4 more before they could come and caulk..
 sheesh-- it was 2 regular size rooms lol... but its done and if I hurry and decorate I might be able to participate in the kitchen party posted on the sidebar of my blog..
  During this same span of time we also got the trees and shrubs trimmed- new mulch and the house power washed... I like the idea we are going into winter with all the major things done.

Last year the rockers were black and could'nt be seen till you were actually on the porch..The garage door and porch ceiling were done in taupe.. I'd had enough of that and called the vinyl man to come and make a change.. We put in a stone walkway and were happy- at that time anyway..
Before- middle of the update..

   I did manage to finally make and get my fall wreath up.. I thought I better do it in traditional fall colors as it will stay up until its replaced for the Holidays.
 I found a birdcage made of twigs and just had to use it..  Right now everything is still fairly green here but in a few weeks that will change..   I used the pears , pumpkins and apples I see at all our local fruit markets.
 You can smell the sweet goodness of those places as you ride by.. Have I mentioned this is my very favorite time of year..  I got 2 large pumpkins and cooked them up this weekend for pies, cakes and breads this winter..   When I bake my pies and post them I'll add my great grandmothers recipe for ya'll..

 If you're going to add a birdhouse you must add a bird, right? :)  I hope the real ones dont peck at him.. Its small and fragile , cant fly away or handle much abuse...
Thank you for taking time out of your life to come and visit me.. I know we are all busy and especially so this time of year.. Its a joy for me to have you here..
  I hope to be able to do some visiting myself this week.. 
Happy Fall to ALL..
Sonny

Wednesday, September 29, 2010

Thank You and What's New

  I wanted to say Thank You all so very much for visiting me and your sweet comments on my last 3 posts..
  I was able to come and personally thank some of you and then time ran out to get to everyones blog..
 Please know YOU are appreciated..
*****************************************
This is what I'll be making while I listen to all the ruckus going on in the kitchen and dining area.. They'll mask those rooms off with plastic sheeted walls and I'll just stay busy elsewhere...
  I've been wanting to work on this sculpt for awhile so now is as good a time as
any.. The photo is of the Completed Baby .... right now its just blobs of vinyl in a box lol.. 

  A few weeks ago I cleaned  the top of my kitchen cabinets and added Decor.. I should have known that was a sign , hahahahaha..
  My painter called last friday to say he had a break in his work schedule and could get to me for the work I had wanted done for several months..  The dining room and kitchen were the last 2 rooms in this home that had ::play scary music here::  W A L L P A P E R ~!!  4  layers of wallpaper to be exact..   Now I am a brave DIYer but I know that meant many hours of intense labor as well as the top sheet rocl paper peeling off and needing to be spackled- sanded- primed and painted... I wimped out on doing it myself and told him OK, come on tuesday and he did..  
  As many of you know this project is more intense than it sounds. Everything had to come off the walls- off the cabinet tops- all decorations wrapped and stored and and and...  lol...   Like I didnt have enough mess with just this,, Mr. Dreams decides that while Carlos is already here and has a few days for us, have him go ahead and clean out the ENTIRE ATTIC - so new insulation can go in up there....   My entire garage floor is now full of STUFF-- 90% of which is going to charity.. I havent been up in the attic in years - so apparently I dont use or need it...   I checked quickly= no important papers or photos , so its outta here...

  Now, he wants the main storage building cleared out too...  IF I open my eyes too wide, will my eyeballs fall out????  

 Can you just envision all this MESS going on right when I was ready to do my fall decorating in earnest?? Please try cause no way am I taking photos :)

 In about a week, all this will be but a memory and things will be back to normal but till then-- oh my..
I'll have some time to come and visit ya'll but I wont be doing any posts and I didnt want ya'll to worry..
So take good care of yourselves and Happy Fall .. I'll be back with ya as soon as I can..

Sonny

Sunday, September 26, 2010

Brick Transformed, My Way:)

   Hi Everyone..
 I love my brick home but its the normal reddish with blue sorta brick and while thats great for outdoors, it wasnt suiting me in the family room.. You see one of the walls used to be an exterior wall and it was the reddish brick, like this..


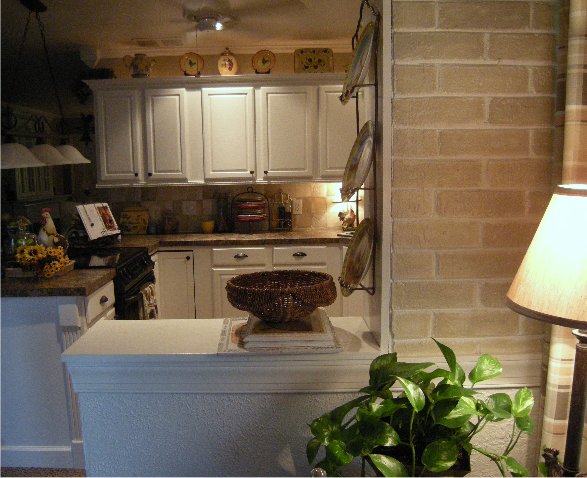
 My family room is painted relaxed khaki, with soft white trim and soft white below the chair rail. This red brick just wasnt working for me...
 this photo shows me doing the faux treatment on it..


This isnt the easiest room to photograph..

   On the side of the room, you can see into the kitchen , the paint colors are the same and now the brick mimics the backsplash..


 The tutorial below takes you step by step so if you'd like to you can also change your brick:) 
 if you have any questions, email me and I'll try to help you...
 Thanks so much for visiting me and peeking at my brick transformation...
Sonny
 *********************************
TUTORIAL
step 1
I painted my entire wall my trim color- which was soft white/satin finish by SW.. the WHOLE wall brick and grout.. this requires a deep nap roller cover and keep a brush handy to push the paint into any of the stubborn crevices of the brick.. I did 2 coats waiting 3 hours in between for dry time..
you all know what plain white brick looks like so, no need for me to show you that...
allow 12 full hours for drying time because in some of those brick crevices it can stay wet a lot long than the surface paint indicates...


step 2...
you need a pack of stencil brushes from large to small.. I got mine at walmart for 5.99

3 plastic sour cream containers~~they have great snap lidsSmile you'll be closing them and resting, believe me and you dont want your mixed paint to dry out ..

My wall color is relaxed khaki by sw...
in container no. 1 the straight paint goes in about 1/2 full is enough-- it goes along way..

using country brown craft paint , I tinted the next container of relaxed khaki with 1/3 of the craft paint to darken it..

container 3 is relaxed khaki and 2 oz. of water. stir well..


step 3...
cover the floorSmile
using your smallest tip stencil brush in about a 5x5 space and randomly "squiggle" some of container number 2::the tinted darker color:: onto the brick in places-- NOT all over.
~!!!! the stencil TIP is all that will have paint on it-- do NOT dip the brush into the paint.. Just the tip gets color..
continue in 5x5ft. spaces until that step is completed..
PS: this is gonna look scary cause when you step back it'll look like worms on your fresh white wall-- but your fineSmile thats how its supposed to look.


step 4...
now using container 3 ::: the watered down wall color using the medium size stencil brush in your pack-- start again with the 5x5 space you started with in step 1.. several hours should have passed between steps so its dry... dip the tips of your brush and tamp it on the brick ONLY ,, if this runs it will get on your beautiful new grout.. keep some q tips handy just in case to get that off- but seriously-- try not to let it drip..
continue working those 5 by 5 ft. spaces as in step one.
heres a pic of that process ...I wait to do the bottom till I can scoot across the floor cause once I get down there I'm not getting up till I'm done lol

step 5...
now container 3 has the straight paint color in it and what you want to do is dip only the tips of your brush and pounce all over the brick-randomly- dont redip. No worry//when it dries it wont look like dots lol. this really will help each brick be a bit different, just as they are in nature..
total supplies even with NONE on hand would only be about 50.00 -thats paint//brushes and plastic drop cloth. Sometimes there are sales on regular white paint- doesnt have to be any fancy brand. Once its on brick it isnt coming offSmile
  Time.. just taking a ballpark guess I'd say 7 full hours... that doesnt include drying time in between the initial coat of paint..
a fireplace would take maybe 2 1/2 hours.